Friday, 29 June 2007
One Star Paddler!!
The ICC changed venues from Cattawade to Dedham last night and our instructor decided that we'd do our 1 star award. It was pretty windy but we used the shelter of the mill to do the various manoeuvers required and I'm glad to say I passed.
Thursday, 28 June 2007
First top coat
Spent about an hour last night putting the first of the top coats on. I'm not sure about the colour; which is blue, I think because the undercoat is showing through a bit still. I'm sure the colour will deepen as soon as the second coat is applied.
Almost there - the plan for my first launch is either next Friday evening or Saturday sometime wife permitting.
Almost there - the plan for my first launch is either next Friday evening or Saturday sometime wife permitting.
Wednesday, 27 June 2007
Final undercoat
Put on the second and final undercoat last night and this morning - kids woke me up early again! Also added the bulkhead hatches including the mastic to create a watertight seal plus fitted both seats, thwart and yoke. It really does look like a boat now.
Bought some exterior gloss paint for the top coat so am hoping to get it finished by the weekend ready for a first trip out sometime the week after.
Things left to do:
Bought some exterior gloss paint for the top coat so am hoping to get it finished by the weekend ready for a first trip out sometime the week after.
Things left to do:
- Paint the exterior
- Varnish the exterior
- Buy painters
- Get out on the water
Total expenditure to date £392
Tuesday, 26 June 2007
Undercoat


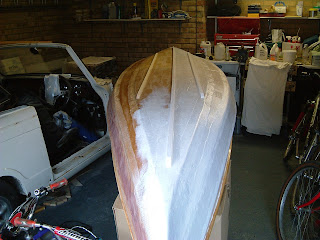
Gave the cabin area a last coat of varnish. Turned the boat over and sanded down the rough epoxy from the bilge runners then sponged the whole of the outside down to get rid of all the dust. Woke up early this morning and started painting the undercoat on but was only able to do about half the boat before running out of time and having to go to work. It looks like the paint has taken ok as this was a concern after reading several posts from SoTP.
Total spend to date £377
Monday, 25 June 2007
Bilge runners


Glued on the centre and bilge runners over the weekend. I didn't want to drill and screw through the hull to attach them (as per the plan instructions) so used the by now familiar epoxy/ woodflour mix. Once dry I then filleted the join to the hull to fill the gaps and to make it a bit stronger. The bilge runners are supposed to stiffen the bottom panel and reduce the "oilcanning" effect seen. I didn't want to test this out just yet but will wait a few days until the resin has completely cured. I'm almost out of hardener now but that's fine as this job was the last of the constructional type tasks.
Gave a second coat of varnish in the cabin area - only one more to go! Bought some undercoat which I'll try applying tonight. Also need to buy a top coat the colour of which I think will be a dark blue.
Gave a second coat of varnish in the cabin area - only one more to go! Bought some undercoat which I'll try applying tonight. Also need to buy a top coat the colour of which I think will be a dark blue.
Wednesday, 20 June 2007
Glassing the hull
Back to glassing again, this time it was the bottom of the boat to help protect it against general wear and tear. It's not pretty as I had to use about 6 strips of 75mm tape so some of the joins are a bit ragged and lumpy but it will be functional. Put a second coat of varnish on the thwart, seat ends and hangers and portage yoke. One more on each of those and they'll be done.
Things left to do:
Things left to do:
- Fit centre and bilge runners
- Paint the exterior - undercoat and topcoat
- Varnish exterior
- Apply more coats of varnish to piece parts and interior
Tuesday, 19 June 2007
Thursday, 14 June 2007
Varnish - coat 1

Didn't have much time last night since I was on babysitting duties so decided to coat the complete interior with a coat of varnish. I also coated the yoke, thwart and seat hangers. Took a look this morning and the varnish really brings out the wood grain and gets rid of the sanding marks etc.
Need to glass the bottom before doing anything else though.
Need to glass the bottom before doing anything else though.
Wednesday, 13 June 2007
Both seats fitted
Measured, cut and fitted the bow seat last night - used the same method as with the first seat. I need to get the seat hangers cut down by 10mm though as the seat is angled back a bit due the hangers all being the same length. Since the hangers are attached to the top panel the seat follows the curve hence the need to alter the hangers.
Picked the canoe up (not as heavy as the borrowed plastic one I'm using) and put it outside on the drive for a sponge down in readiness for painting and varnishing etc.
Bought some more M6 stainless bolts this morning to fit the portage yoke and thwart . They're cap screws and I'll sink them in the gunnels then cap them off with a dowel insert. Gave the runners for planing, thwart for routing and seat hangers for cutting to my neighbour who'll do those jobs for me today.
Tuesday, 12 June 2007
One seat fitted
Spent only a short time in the garage but it was quite productive
- Seat hangers: Used a 20mm wood drill and made a blind hole in a wooden block about 50mm deep. Once done changed the drill bit to a 6.5mm one, dropped the oak dowels being used for the seat hangers in the 20mm hole and drilled through the centre. This was the only way short of using a lathe that I could think of that would guarantee getting the hole in the centre and true all the way down the dowel
- Drilling the inwale: Used my pre-drilled wood block with a 6.5mm hole drilled through at 5 degrees offset so I could drill through the inwale
- Fixed the bolt to be used to fix the seats down into the drill, aligned the dowel and seat to the correct position w.r.t. the inwale hole and ran the drill all the way down the hole to touch the seat and mark the required drill position. Used the pedestal drill and drilled through the seat.
Above process repeated until all the holes were drilled etc. Fitted the seat and lightly tightened the nuts. The seat needs to be disassembled so the parts can be varnished.
I'm glad I started (and partially finished) this as I've been putting it off a bit not really wanting to drill through the gunnels in case I got it wrong but the drilling block worked well.
Monday, 11 June 2007
Work stops work
Haven't done anything on the canoe at all for 2 weeks now. Been working away and then for various reasons haven't been able to get into the garage.
Anyway here's the plan of some of what I shall be doing this week:
Anyway here's the plan of some of what I shall be doing this week:
- get my runners planed down to the right size - Done
- get the portage yoke routed and fitted - Done
- completely glass the underside - Done
- Make a jig so I can drill through the centres of seat dowels - Done
Subscribe to:
Comments (Atom)


